Wednesday, November 9, 2016

FRANOLA!

You like granola?  I make FRANOLA!  It is delicious!  Never heard of granola when growing up, never saw it, never ate it. Once I discovered it I've had commercially made granola and would put it in yogurt. The only reason I knew to do that was because the King & I (haha - get it?) went to DisneyWorld years ago, I think back in 2007 for our 30th wedding anniversary, and one morning we got to the Magic Kingdom, it was early, we were hungry and stopped on the Main Street somewhere and had cups of yogurt with granola and fresh fruit.  It was the first time I'd ever eaten granola or that parfait and it was DELICIOUS!  Every morning for the rest of the week I had one of those breakfast parfaits.  

So, when we got back home to NJ the first thing I did was buy strawberries and lowfat yogurt and granola.  Really good, but the granola was a bit 'dusty' and, now that I think about it, stale.  

Over the years I've tried different brands, to no avail.  Always stale tasting and dry.  Until I found the Cook's Illustrated recipe and made it one day and BAM!  It was great!  

Without further blabbing, here you go.  It is really delicious!  Of course you can adapt to your own liking, add any kind of dried fruit you want, just remember to mix it in AFTER it's baked and cooled. If you add dried fruit to the mix before it goes in the oven they will be like little pieces of leather...ick!

FRANOLA RECIPE

Adjust oven rack to upper-middle position and heat to 325 degrees.  Line a rimmed baking sheet with parchment paper.

While the oven pre-heats, gather your ingredients:

1/3 cup of maple syrup
1/3 cup packed light brown sugar
4 teaspoons vanilla extract
1/2 teaspoon salt
1/2 cup vegetable oil
5 cups old-fashioned rolled oats
2 cups raw almonds, chopped coarse
2 cups dried fruit, chopped - I use currants or raisins, Use whatever you want or have on hand.

Once you have everything in place, in the large bowl whisk the maple syrup, brown sugar, vanilla & salt together.  Whisk in oil.  Fold in oats and almonds until thoroughly coated. 

Transfer oat mixture to the prepared baking sheet and spread across the sheet into a thin, even layer (about 3/8" thick). Using the flat bottom of a measuring cup or a stiff metal spatula, compress the oat mixture until very compact.

Bake until lightly browned, about 40-45 minutes, rotating the pan once halfway through baking.  Remove Franola from the oven and cool on a wire rack to room temperature, about an hour.  Break cooled granola into pieces of desired size.  Stir in dried fruit.

Can be stored in airtight container for about 2 weeks (if it lasts that long).

The Franola will be lightly sweet with a very light maple flavor.  This isn't strongly flavored but the bit of vanilla, maple and salt really make it delicious!

Enjoy!  

Friday, September 2, 2016

FETTUCCINE with SHRIMP and PEAS

On Wednesday night I had no idea what I was going to make for dinner.  I dragged in got home from work, opened the freezer, and a bag of raw shrimp was staring at me. Beside it was a bag of petite peas. I thought, "Bingo!"

I put the frozen raw shrimp in a colander in the sink to defrost a bit, put on the water for the macaroni and got to work.

I chopped 4 cloves of garlic and added them to the pan with 3-4 T olive oil. (Who am I kidding?! I just poured oil in the pan until I thought there was enough!)  Once the oil began to shimmer and the garlic was sizzling I added a couple of pinches of pepperoncini.  The oils from the dried pepper flakes turn the oil a reddish color which means it's time to remove the pan from the heat. 

By this time the frozen shrimp should have defrosted a wee bit so shell removal is easy. Quickly rinse shrimp in the colander with cold water, remove shells, pat dry with paper towels, and season with salt and pepper.

I put the pan back on the heat and turned up the flame.  When it was hot, lower heat to med-low and add shrimp in single layer. Keep heat on low. Cook until sides of each shrimp are pink, turn over and cook for about 30 seconds more. Add peas and stir all together.Add pan back to heat, turn it up and when it's ðŸ”¥ hot,  I lowered the heat to med-low/low and added the shrimp in a single layer. I kept the heat on low to slowly cook the shrimp.  You have to be careful here, don't cook too fast as the very middle of the shrimp are probably still frozen or just this side of thawed and you don't want rubber shrimp. I cooked them until the sides of each shrimp were slightly pink, turned over and cooked for about 20  seconds more. I added the peas and stirred it all together.  I then added about 1/4 cup of tomato sauce to the pan to give it all a tomato sauce base.  Instead of the tomato sauce you could add butter, lemon and white wine...whatever you like, or not add anything else.  The flavor of the garlic, shrimp and pepperoncini are enough with the pasta water and an extra shot of olive oil once it's off heat.

Using tongs, I transferred the al dente fettuccine from the pot of water and added it to the pan.  I used about 1/2 lb of macaroni, the rest I drained and put in a ziplock for use another day.  

I tossed the entire mixture in the pan and then served it immediately!

And how was it?  It was delicious!  Sorry I didn't think to take a picture on the dinner plate. Once it was served I didn't think about taking a prettier picture on the plate until after it was all gone! Ha!

Mangia!


Sunday, August 14, 2016

Chicken Chow Mein for the win! Delicious!

Another hot, humid, rain, lightning, thunder, very frightened, dogs-shaking-like-a-leaf day in Happy Valley. Praise God that He gave someone the intelligence to invent air conditioning. I am always so grateful that a/c is in my car, in my house, in my office building, and in most places I go during the summer. The good thing about this weather is that it has brought the rain. The farm fields in the surrounding area were forlorn and turning brown rapidly. We've had a few days of thunderstorms and crazy lightning and that seemed to help a bit.  I hope it helped enough to keep the crops alive. I did notice and was told that the corn is too short for where it should be at this time in August.  We will see...

On to the recipe! I have been in such a mood for Asian flavors lately.  Mostly mee goreng and fried rice and lo mein.  In the recent past I've made all of the aforementioned items at home and then earlier this week we ordered take out from our favorite Chinese restaurant in town.  It was good, but it didn't satisfy my hankering for those strong flavors of ginger, oyster sauce, rice wine...

I came across a Chicken Chow Mein recipe from Cook's Country a while back and also saw the ATK show when they made it.  I have been meaning to download the recipe and make it myself but only got around to it last week. 

The most important element when making stir fry is mise en place - everything in place. It is the MOST important step before you turn on the stove. Prep is one of my most favorite things to do so this is easy for me. I also line everything up beside the stove so I can put it in the frying pan and move the empty dish to the other side of the stove out of my way. This assures no clutter or accidents. The more organized a cook you are the better the experience. 

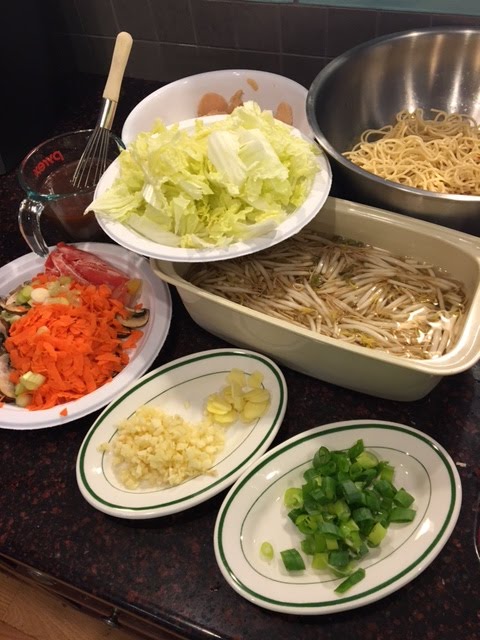
Mise en Place for Chicken Chow Mein
You can see I have everything prepped and ready to go. Believe me, it's so much easier to cook like this. I used to be able to prep while cooking and it was all good, but that was before I started forgetting ingredients and questioning whether or not I added something. It's too stressful to cook like that now, for me. I'm getting older and get distracted more easily.  This method is well worth the extra time, in my opinion. 

The ingredients are as follows, clockwise from top:

Bowl of sliced chicken, marinating in dry sherry and a bit of cornstarch
Cooked noodles tossed with a bit of toasted sesame oil
Bean sprouts (in a bowl of cold water to keep them crispy)
Scallion tops
Slivered ginger and minced garlic
Shredded carrot bits, sliced mushrooms, the white part of scallions
A semi-frozen clump of red peppers
Sauce - a mix of dry sherry, chicken broth, oyster sauce, soy sauce, and cornstarch
Napa cabbage

The Cook's Country recipe is delicious, but I adapted it for what I had in my kitchen.  I didn't go out to buy any special ingredients for this.  I wanted to use up what ingredients I already had in my refrigerator/freezer.  This is a great dish for doing just that. 

Chicken Chow Mein
adapted from Cooks Country

1 (9 ounce) pkg fresh Chinese noodles -- I used leftover spaghetti
1 Tbs Toasted Sesame oil
1 tsp Baking Soda
2 boneless, skinless chicken breasts, trimmed and cut into 1/4 inch thick slices -- I used a pound of chicken breasts
3 Tbs Chinese rice wine or dry sherry -- I used the sherry since that's what I had
1 Tbs cornstarch
1/2 cup chicken broth
3 Tbs soy sauce
3 Tbs oyster sauce
1/4 tsp white pepper
2 Tbs vegetable oil
6 ozs shiitake mushrooms, stemmed and sliced thin -- I used what I had, baby portabellas
1 carrot, peeled and cut into 1/4 inch thick matchsticks -- I used a large holed grater and just chipped away at the carrot on the grater.  It was less work than slicing up a carrot into matchsticks!
2 celery ribs cut on the bias into 1/4 in thick slices -- I am not fond of cooked celery and rarely have it in the house, so I used Napa cabbage. I ran out of bok choy or I would have used it in place of the celery.
4 scallions, white and green parts separated and sliced thin -- I used 2 scallions, it was enough for me.
1 Tbs fresh ginger, grated -- I peeled and thinly sliced a 1 inch piece of ginger because I like it very much!
3 garlic cloves, minced -- I used 4...or maybe 5 :)
4 ounces mung bean sprouts

1.  Boil water and cook noodles.  If you buy fresh Chinese noodles they cook in about 3 minutes.  If you use spaghetti or vermicelli then just do what you usually do to cook your spaghetti. After cooking, drain noodles, rinse in cold water then drain again.  Toss noodles with sesame oil in bowl and set aside.  If you use leftover spaghetti, just toss with the sesame oil and set aside.
2.  Dissolve baking soda in 1/2 cup of water and add sliced chicken (this step keeps the chicken tender) Let chicken soak for 15 minutes at room temperature. Drain, rinse under cold water, drain again then pat dry with paper towels. Combine 1 Tbsp rice wine (or dry sherry) and 2 tsp cornstarch and chicken in bowl; set aside.
3. Whisk broth, soy sauce, oyster sauce, white pepper, remaining 2 Tbs rice wine (or sherry) and remaining 1 tsp cornstarch together in bowl; set aside
4. Heat oil in 12-inch non-stick skillet over high heat until just smoking, then: 

Add chicken, stirring frequently, until opaque, about 2 minutes
Add carrot and mushrooms, stirring frequently, until tender, about 2 minutes
Add celery (or whatever substitute) and cook for about 1 minute
Add scallion whites, garlic and ginger and cook until fragrant
  • what I did with the ginger slices was make a hot-spot with a bit of oil on the side of the pan and fried the ginger slices first, and when they were lightly browned I added the garlic and scallion whites and cooked for about 30 seconds
Whisk the broth mixture to recombine (the cornstarch settles to the bottom so mix well) and add to skillet.  Cook until thickened and chicken is cooked through, about 2 minutes. 

Add bean sprouts and noodles and toss until sauce evenly coats noodles, about 1 minute.

Transfer to platter or bowl and top with scallion greens.  Serve.

If you'd like to add a bit of heat, I use Sriracha or Frank's Red Hot Sauce or Sambal Oelek. They all work well with this dish.

I hope you try this recipe as it is so easily adaptable to whatever veggies you have in the house.  I have never bought rice wine, but I always have Marsala or some other dry sherry for other recipes, so I use that. It works perfectly!

After the Napa cabbage was added. You can see the carrots, peppers, mushrooms and chicken all bubbling away! 


Bean sprouts added


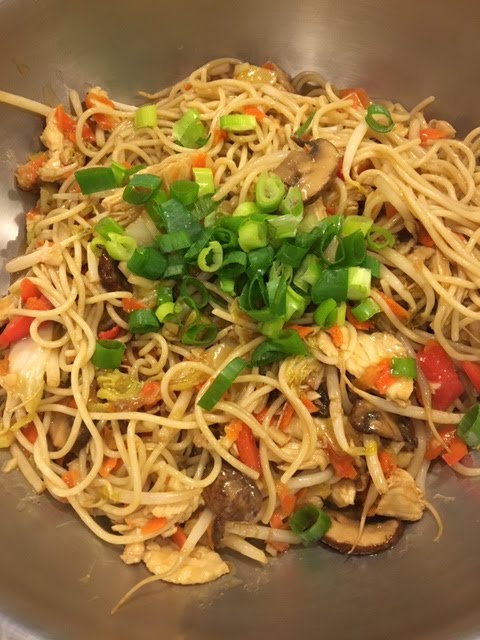
In the bowl, topped with scallions


A nice close-up! I wish we had smell-o-blog! 


Wednesday, May 25, 2016

Another horrible dining experience in Centre County

My husband and I celebrated our 39th wedding anniversary two days ago. Another year of attempting to go out and enjoy a nice dinner in this university town. Another year of incredible disappointment in the quality of food served in area restaurants.
We had a $50 gift card to The Tavern in State College, PA.  I ordered the sirloin, medium, he ordered the liver and onions. I received a hockey-puck-sized lump of meat very obviously overcooked. He received a flat piece of what looked like leather with overdone bacon, and onions that were barely recognizable.
Who does this to food?! Why?!
I attempted to slice my sirloin with the serrated knive provided and the meat shredded under the pressure. Completely shredded. It was disgusting. His thin slab of liver was no better. Overcooked, dry and inedible. Honestly, I am appalled at what they charge for food here. Appalled!
We began our evening with drinks that we had to send back because we were sure the bartender forgot the alcohol. Nope! They came back the same way, watery and flat. It was a taste of things to come.
This particular restaurant is a supposed beloved institution…why, I will never know. It’s crap. The interior is dark, dank and dingy. There were waterstains all over the ceiling. The faux colonial style brass hanging lamps over every table were filthy, pitted, and dusty. The floor was sticky. The Windsor style chairs we were sitting in were dirty, scarred and creaky. Do these people not clean their restaurant every day?!
When we owned our restaurant you could literally eat off of our floors, not just in the dining room but in the kitchen as well! They shone like glass, they were immaculate. The minute food or straw wrappers or anything landed on that floor one of our wait staff promptly cleaned it up. No one wants to eat in a restaurant with dirty floors or sticky tables. What does that say about the cleanliness of the kitchen? Do they leave food debris all over the place, possibly contaminating your dish? Do they care? This place certainly does not.
The Tavern also has a horribly insulting dining gimmick – unlimited sides. The list of sides was recited with such enthusiasm by our sweet waitress that I actually laughed when they arrived – it was an image I won’t ever forget. Teeny, tiny little monkey dishes with one or two tablespoonsful of food. Our forks were too big for the dish, they were that small.  No wonder diners around us were ordering 6, 7, 8 of the sides right away with their main courses. What a joke!
After six years of living in this area we have yet to find a restaurant that is worth the money paid for a meal.
I do not fancy The Tavern in State College, PA.  Not at all.

Thursday, January 7, 2016

Unpinning Pins & Sloppy Joe's

After searching far and wide for a tasty recipe for Sloppy Joe's I finally found it, right under my nose the whole time at Cook's Country. On Pinterest I had repinned a plethora of pinned recipes relating to Sloppy Joe's and read all of them but cooked 5 of them over a few months. They were not good. Even the ones that boasted THE BEST SLOPPY JOE'S YOU WILL EVER EAT - THE BEST SLOPPY JOE RECIPE! - THE ABSOLUTE BEST SLOPPY JOE RECIPE YOUR FAMILY WILL LOVE! Nope, they were not good. Not good at all. 

I realize taste is subjective and we like what we know, what we grew up with, what is familiar when it comes to food.  But there does come a time when our tastes change and we want something that actually has good flavor. That's where I'm at these days. I don't know if it's my age, my food-snobbery rearing it's head, or what, but I couldn't stand the recipes I was making for Sloppy Joe's. Fully of sugar, salt, butter (?!) apple cider vinegar, Worcestershire sauce, and on and on, it was all too much. Way too many ingredients for a single pound of chopped meat. And would we taste the meat? No. We would taste salt and sugar and vinegar and more salt. It was crazy. 

To be fair, I did not grow up on Sloppy Joe's. I grew up on Boar's Head deli meats on the best freshly made Italian bread bought at Moltisanti's bakery across the street from our apartment building. Or, a hero bought in one of the neighborhood delis. There was no Manwich in our apartment, nor in my house once I married until my husband (from a small PA town) asked me to make Sloppy Joe's one day. I bought a can of Manwich and made them. They were meh... I would rather take my meat sauce and ladle it over crusty Italian bread, or better yet, make a meatball hero. So much better! 

Anyway, I began searching for a recipe in old cookbooks, really old cookbooks, and read about the origins of the Sloppy Joe. Of course, there's controversy - The Heinz Co. says the Sloppy Joe originated in Sioux City, Iowa when a cook named Joe added tomato sauce to his loose meat sandwich back in the 1930s. Other's say the Sloppy Joe sandwich originated in Cuba. Then there's the NJ Sloppy Joe which is a triple-decker deli sandwich always made on rye bread, with either roast beef, corned beef, or pastrami, with Swiss cheese, coleslaw and Russian dressing. Oh, that sandwich is delicious! Memories of The Market Basket in Franklin Lakes, NJ..... they made the best!

The ground beef Sloppy Joe may have conflicting sources for it's birth, but it is a good sandwich and perfect for this time of year. It's cozy. It's warm. It's comfort food. It's fun to eat because it squirts out the sides and lands on your Trader Joe's Corn Dipping Chips and it's tasty on those little golden scoops as well! 

So, I made the pinned Sloppy Joe recipes a few times and the last time I made them the King & Princess said, "Ewwww...this has too much vinegar!" and I thought, that's it, no more with these ridiculously overdone recipes. Time to pare down the ingredients and overwhelming flavors and unpin those pins! 

Time went by and I thought, "Duh! Check if Cook's Country or America's Test Kitchen or Cook's Illustrated has a recipe!" I did and they do. I made it last week and it was clearly a nice, flavorful, clean recipe with minimal ingredients and delicious flavor. The meat was tender and juicy as well, not dried up little granules of ground beef drowned in tomato sauce. The sauce the recipe made was tasty and thick. Just thick enough to stay on the bun but if you 'just happen' to overfill the bun then some will invariably drop onto your TJ's corn dippers, and that would be just fine! 

Sloppy Joe's Recipe adapted from Cook's Country:

Tips: Cook the ground beef until just pink - not browned - before adding the sauce ensures the meat stays tender. Combining tomato puree and ketchup gives a sufficiently sweet, rich tomato base to build a nice complementary flavor with chili powder, hot pepper sauce and garlic. 

Ingredients:
  • 2 Tablespoons vegetable oil
  • 1 medium onion, chopped fine 
  • 1/2 teaspoon table salt
  • 2 cloves of garlic - minced 
  • 1/2 teaspoon chili powder
  • 1 pound 85% lean ground beef
  • 1 teaspoon brown sugar
  • 1 cup tomato puree
  • 1/2 cup ketchup
  • 1/4 cup water
  • 1/2 teaspoon hot pepper sauce
  • Ground black pepper
  • 4 hamburger buns
Instructions:
  1. Heat oil in large skillet over medium-high heat until shimmering. Add onion and salt and stir, coating with oil. Reduce heat to medium, cover and cook for about 10 minutes. 
  2. Add garlic and chili powder and cook until fragrant.
  3. Add ground beef, breaking up with wooden spoon, stirring until just pink.
  4. Add ground black pepper, brown sugar, tomato puree, ketchup, water and hot sauce, and simmer until sauce thickens, about 8-10 minutes.
  5. Spoon onto buns and serve with your favorite pickles or sides.
And don't forget those Trader Joe's Corn Dippers! 

By the way, this recipe is much tastier the next day, if you happen to have any leftovers.